INTRODUCTION
A panel made to the specification of Federal Aviation Administration (FAA) NDI Proficiency specimen 1A was manufactured to benchmark the capabilities of the dolphicam2. This panel features various manufacturing flaws typical of aerospace composites, and as such, is used to assess the performance of both NDT equipment and personnel. The panel is a 32 ply co-cured substructure (16-ply main laminate with 16-ply bonded stiffener substructure and a 16-ply bonded laminate). This corresponds to a nominal thickness over the majority of the panel of ~0.128″ with a maximum thickness of ~0.3” over the stiffeners and bonded area. The panel is 24″×18″ and the flaws present include Carbospheres, pillow inserts, grinding disk cut, flat bottom holes, left-in prepreg backing, adhesive backing, grease, Grafoil, and sealant. Photographs of both sides of the panel are shown in Figure 1.
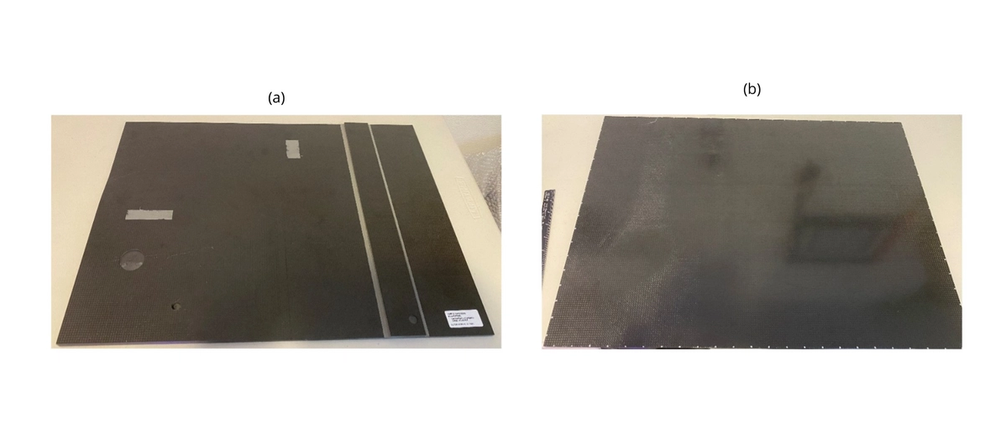
Figure 1. a) Photograph of the bottom face of the panel showing the ply build ups/sound dampers. b) Photograph of the top face of the panel (the “inspection side”).
The nominal locations of the manufactured flaws are shown in Figure 2. The labelled numbers in the figure correspond to the item numbers in Table 1. Figure 2 shows the panel from two orientations; it shows the face pictured in Figure 1a from the same orientation, and underneath this, a side profile of the panel. Further dimensions and details of the panel are given in Figure 3.
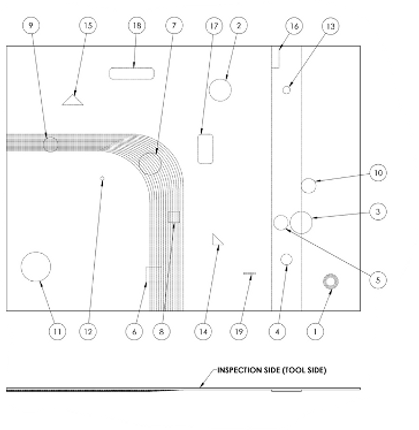
Figure 2. Technical drawing showing main features on the panel in their nominal locations.
Table 1. Nominal dimensions of panel flaws.
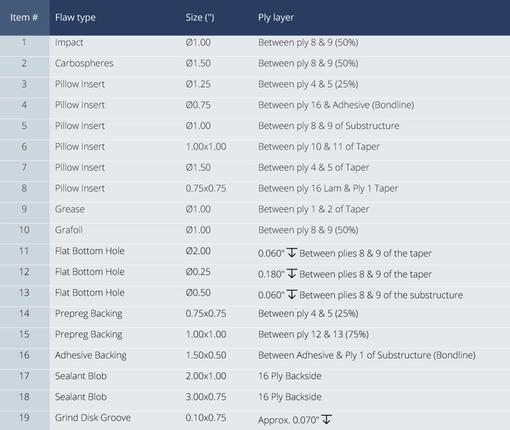
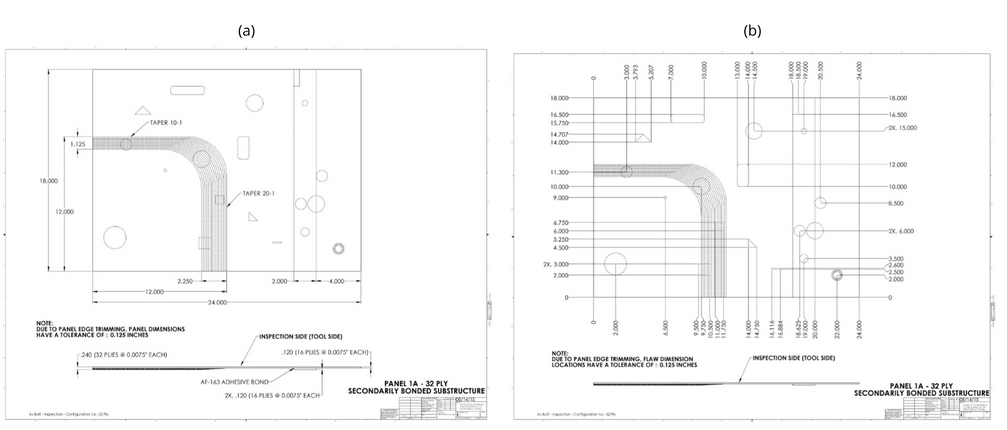
Figure 3. Technical drawings for the specification of the panel.
METHODOLOGY
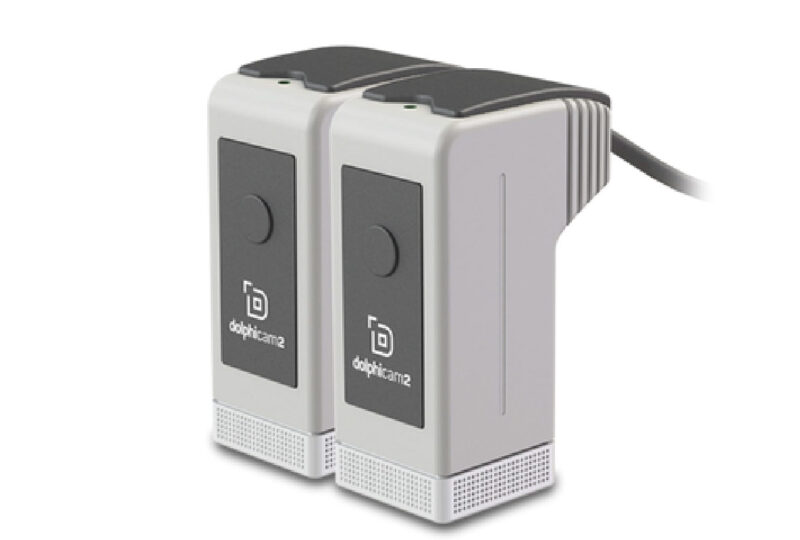
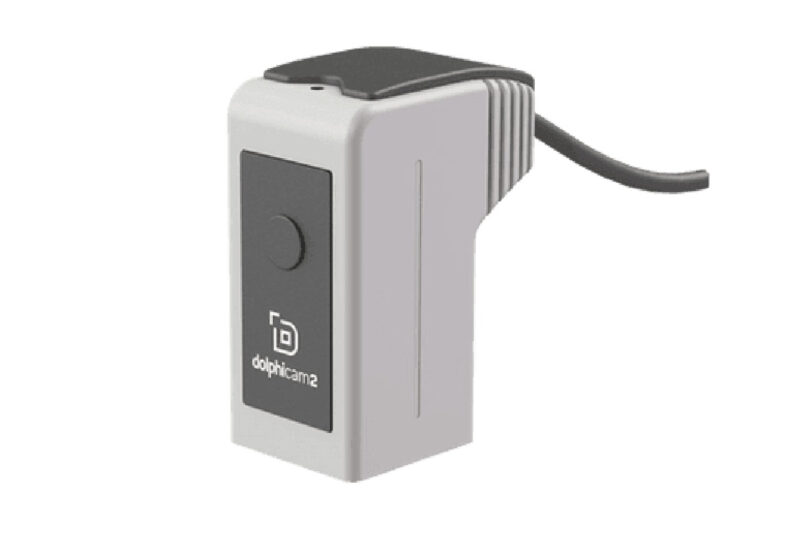
The panel was inspected using a dolphicam2 and a TRM-AF-3.5MHz Transducer Module (TRM). This TRM is our mid-low range frequency model, capable of penetrating the ~0.3” maximum thickness of the panel reliably while still providing excellent resolution of flaws. Also, a factor in choosing this TRM is the attenuative properties of the paste adhesive applied. Deionized water was used as a couplant to provide optimal sound transmission.
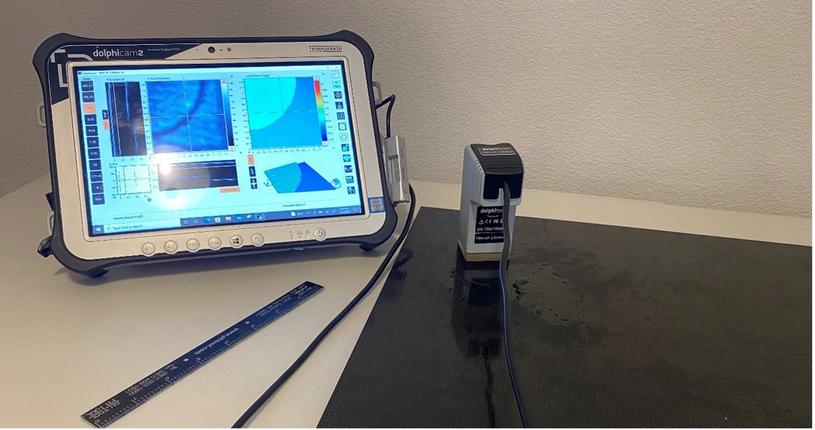
Figure 4. Photograph of dolphicam2 with TRM-AF-3.5MHz transducer on panel.
The flaws were located by freehand scanning the TRM over the entire panel and monitoring the software display. A combination of single C-scans and manually stitched C-scans were acquired where the flaws were located. With the dolphicam2, the amplitude and time of flight data are acquired simultaneously. In this study, the amplitude and time of flight data are plotted in the bone and jet color schemes respectively, and the dimensions are set to inches to be consistent with the panel specifications.
FINDINGS
Figure 5 shows the approximate observed locations of the identified flaws overlaid on a photograph of the panel, adjacent to a technical drawing showing the nominal locations of the flaws. Each yellow box on the photograph represents the approximate region where a C-scan was acquired. The acquired C-scans themselves are shown in Figures 6 to 23. The item numbers on the photograph are orientated based on the orientation of the C-scans. Item 1 (Impact) was not completed by the manufacturer, therefore there are no readings to report. Item 3 was not placed to drawing specifications. The actual location represented in Figure 5b
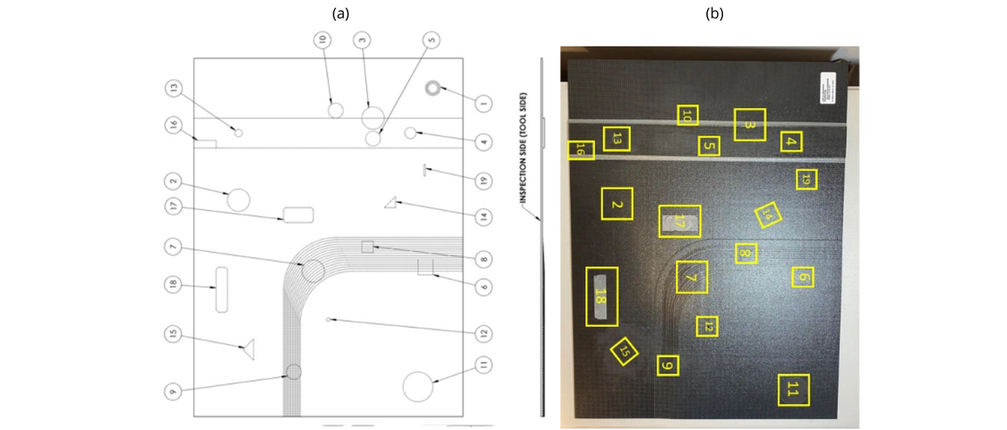
Figure 5. a) Technical drawing, showing the location of flaws from the inspection side. b) Photograph of the bottom face with an overlay of scan areas and corresponding item number(s) for the flaw(s) found within each scan area. The numbers are orientated based on the orientation of the scan.
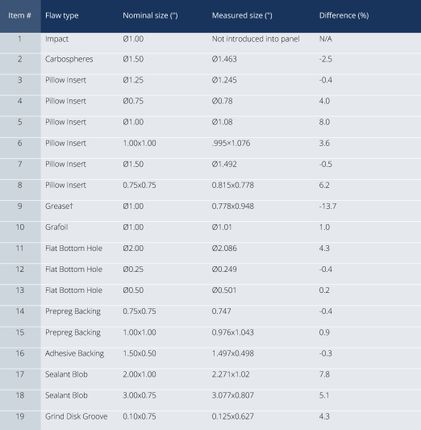
Each scan will be discussed in turn, and the dimensions of the flaws measured from these scans will be noted. There are annotations on each figure showing the measurements taken, with all measurements summarized in Table 2.
Figure 6 shows Item #2 (Carbospheres) which is embedded at 50% ply thickness of the 16-ply structure. Due to the similar acoustic properties of the Carbopheres and the composite structure, there is little reflected signal amplitude to the TRM as most of the sound transmits through the flaw. Amplitude (AMP) and Time of Flight (TOF) gate settings were adjusted to monitor the interior structure, revealing the presence of the flaw. Manually stitched Full Matrix Capture (FMC) C-Scans (AMP & TOF) reveal the flaw sized at 1.463″, measured using the line measurement tool on the C-scan image.
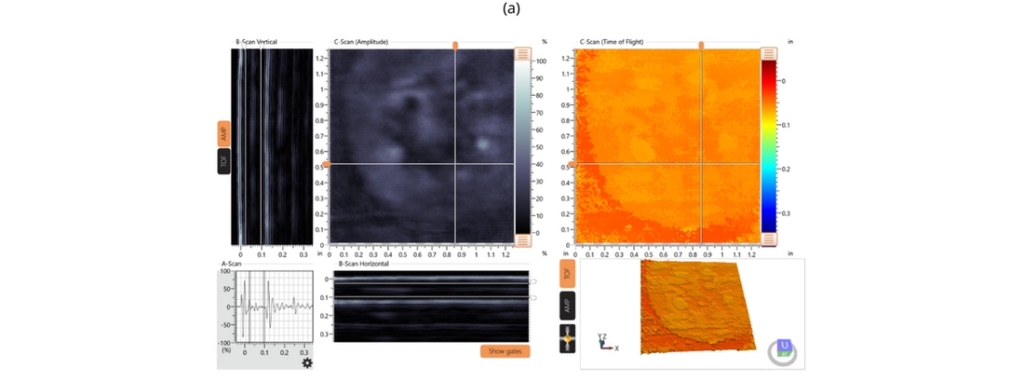
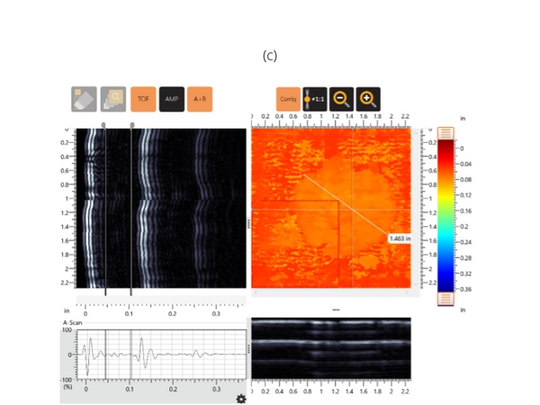
Figure 6. a) All View of Item #2 (Carbospheres) at 50% thickness b) Corresponding manually stitched FMC C-scan (AMP) of Item #2. c) Corresponding manually-stitched FMC C-Scan (TOF) of Item #2.
Figure 7 details Item #3, a pillow insert embedded at 25% thickness of the 16-ply structure that extends over the bonded substructure. The green regions of the TOF view represent the 16-ply structure, while the blue regions represent the backwall of the bonded secondary structure. The dark orange region represents the pillow insert. Measuring the diameter of the flaw in the manually stitched (AMP) FMC image shows a diameter of 1.245″
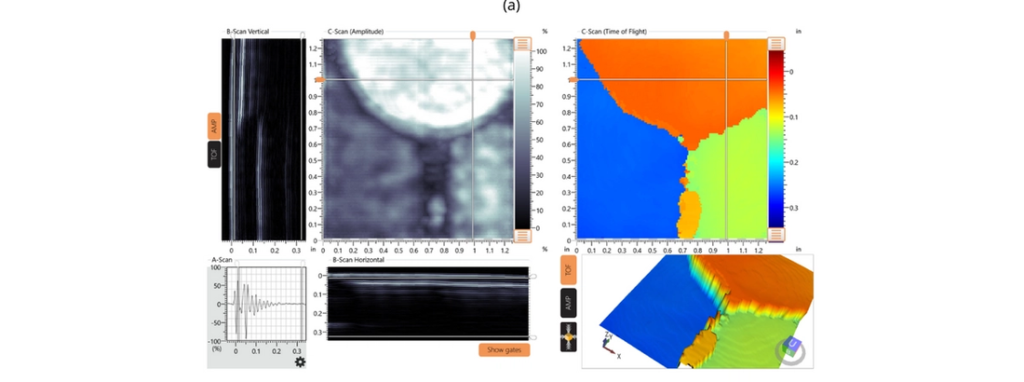
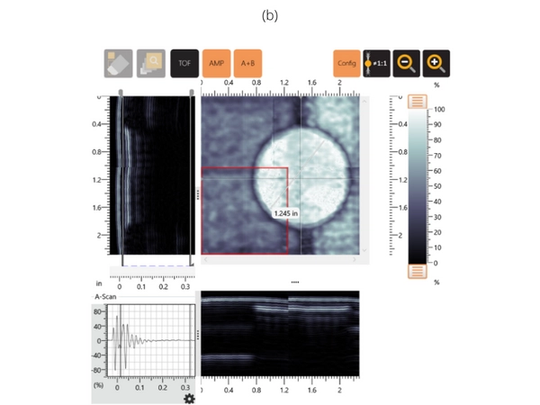
Figure 7.a) All View of Item #3 (pillow insert) at 25% thickness b) Corresponding manually-stitched FMC C-scan (AMP) of Item #3. c) Corresponding manually stitched FMC C-Scan (TOF) of Item #3.
Figure 8 details Item #4, a pillow insert, embedded into the bondline, between ply 16 and the adhesive of the secondarily bonded substructure. The yellow/green circle in the TOF view represents Item #4, while the yellow-green regions to the right represent additional voiding present in the bondline. This is readily characterized through the different display views of the dolphicam2 software. In the AMP C-scan, the outline of the circular pillow insert is visible, indicating that the additional void to the right is clearly a distinct feature. In the TOF C-scan, it is resolved as being at a very similar but slightly shallower depth, which is consistent with its through-depth location at the upper interface of the bondline. The blue region represents the backwall of the secondarily bonded substructure. Measuring the diameter of the flaw in the manually stitched (AMP) FMC image results in a diameter reading of 0.778″. Using dolphitech’s Defect Detection feature in TOF view reveals the flaw encompasses an area of 0.756in², with a measurement of 0.876″ along the Y-axis and 1.299″ along the X-axis.
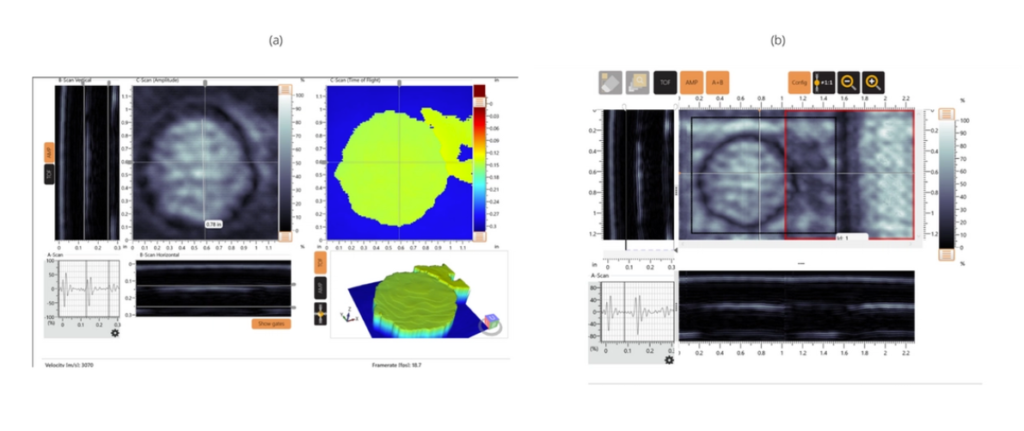
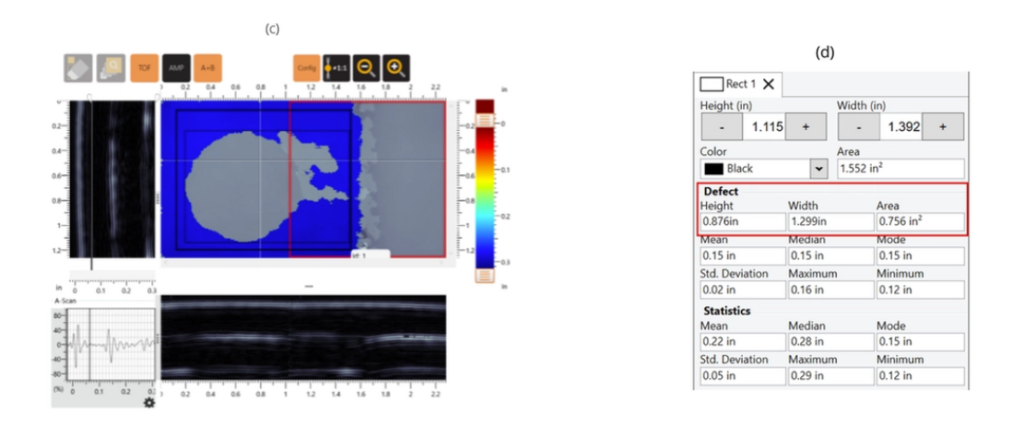
Figure 8. (a) All view screenshot of Item #4 (pillow insert) embedded between ply 16 and the adhesive of the secondarily bonded substructure with corresponding (b) FMC stitched image (AMP) (c) FMC stitched image (TOF) (d) Defect Detection measurements.
Figure 9 details Item #5, a pillow insert embedded between ply 8 & 9 of the secondarily bonded substructure. The light blue circle in the TOF view represents Item #5. The dark blue region represents the backwall of the secondarily bonded substructure. Measuring the diameter of the flaw in the manually-stitched (AMP) FMC image results in a diameter reading of 1.018″
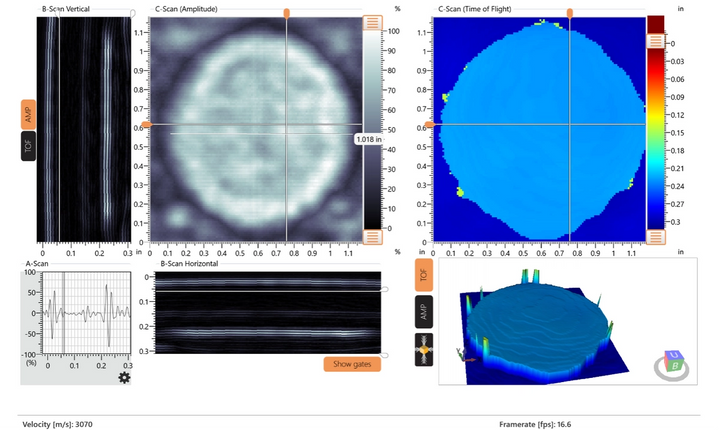
Figure 9. All view screenshot of Item #5 (pillow insert) embedded between ply 8 & 9 of the secondarily bonded substructure.
Figure 10 details Item #6, a pillow insert embedded in the taper (Step Backs) between ply 10 & 11. The light blue square in the TOF view represents Item #6. The transition from a darker blue region to a lighter blue region represents the slope of the backwall into the taper. Measuring the flaw in the AMP FMC image using the line measurement tool shows a measurement of 0.995″ along the Y-axis and 1.076″ along the X-axis
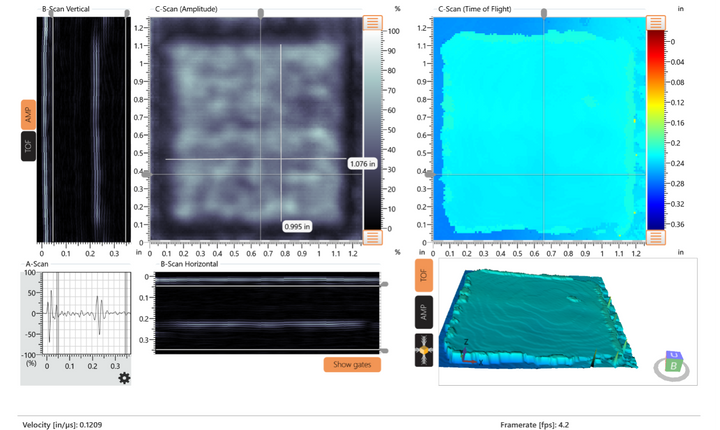
Figure 10. All view screenshot of Item #6 (pillow insert) embedded in the stiffeners (step backs) between ply 10 & 11.
Figure 11 details Item #7, a pillow insert embedded in the taper (Step Backs) between ply 4 & 5. The turquoise circle in the TOF view represents Item #7. The transition from a darker blue region to a lighter blue region represents the backwall of the taper. Measuring the flaw in the AMP FMC image using the line measurement tool results in a diameter reading of 1.492″ for the flaw.
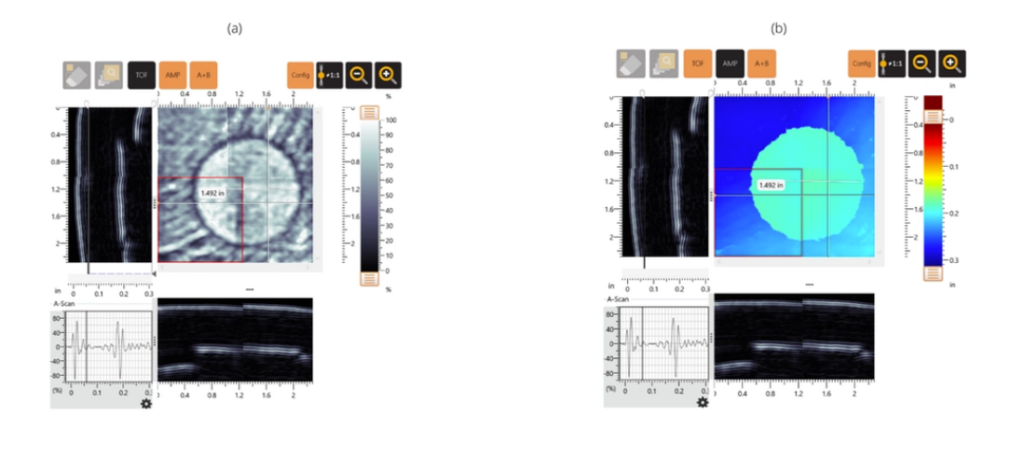
Figure 11. Item 7 pillow insert embedded in the stiffener (Step Backs) between ply-4 and 5. (a) FMC Stitch (AMP) of Item #7. (b) FMC Stitch (TOF) of Item #7.
Figure 12 details Item #8, a pillow insert embedded at the interface between the 16-ply laminate and the taper. The yellow square in the TOF view represents Item #8. The transition from turquoise to yellow is due to the slope in the backwall of the taper. Measuring the flaw in the AMP FMC image using the line measurement tool shows a measurement of 0.778″ along the X-axis and 0.815″ along the Y-axis.
An extra inclusion can be seen to the left of Item #8 represented in the TOF and 3D views by an orange indication. The inclusion can also be identified in the B-Scan Horizontal view.
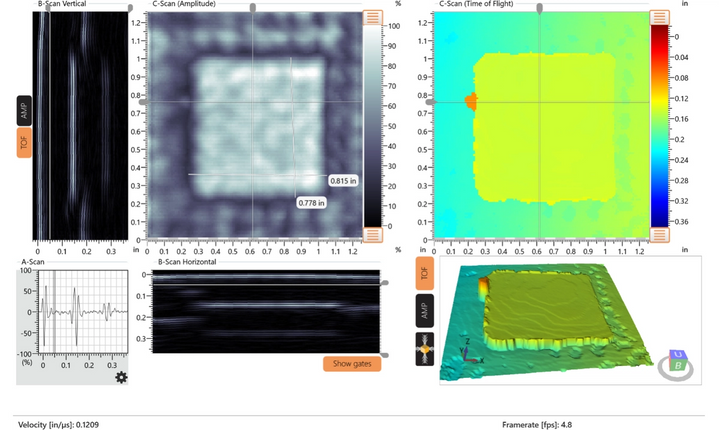
Figure 12. All view screenshot of Item #8 (pillow insert) embedded at the interface between the 16-ply laminate and the stiffeners (Step Backs).
Figure 13 details Item #9, which is grease embedded in the stiffener (Step Backs) between ply 1 & 2. The green regions of the TOF View represent Item #9. The transition from a blue region to a green region represents the backwall of the taper. In the B-scan Vertical view, the backwall of the taper is still visible beneath the grease indication. This demonstrates that although the grease patch represents the highest amplitude reflector, it is not reflecting all of the ultrasound, and determination of deeper indications is still possible. Measuring the flaw in the AMP FMC image using the line measurement tool shows a measurement of 0.778″ along the X-axis and 0.948″ along the Y-axis.
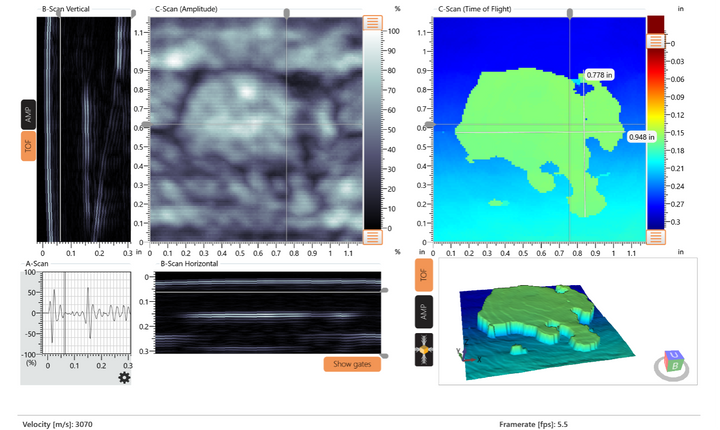
Figure 13. All view screenshot of Item #9 (grease), which was embedded in the stiffeners (Step Backs) between ply 1 and 2 of the stiffener structure.
Figure 14 details Item #10, which is Grafoil embedded between ply 8 & 9 (50%) of the 16-ply laminate. The orange circle in the TOF view represents Item #10. The yellow/green region represents the backwall of the 16-ply laminate.Measuring the flaw using the circular measurement tool results in a diameter reading of 1.01″.
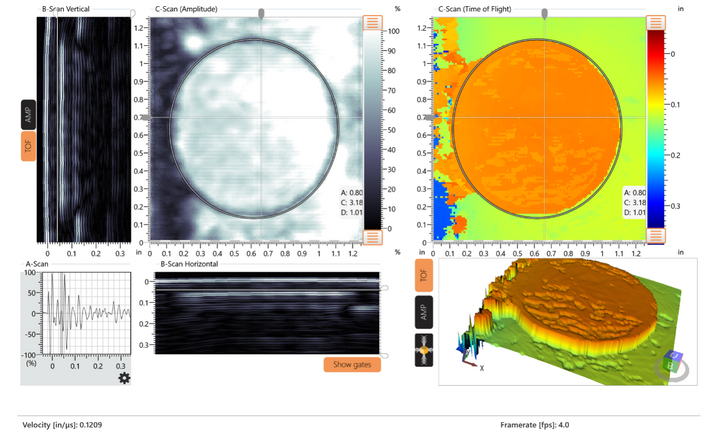
Figure 14. All view screenshot of Item #10 (Grafoil), which was embedded between ply 8 & 9 (50%) of the 16-ply laminate.
Figure 15 details Item #11, a machined flat bottom hole (FBH), that is embedded in the taper between ply 4 and (0.060″ ) of the 32 Ply laminate. The light blue circle in the TOF view represents Item #11. The blue region represents the backwall of the 16-ply laminate. Measuring the flaw using the line measurement tool results in a diameter reading of 2.086″
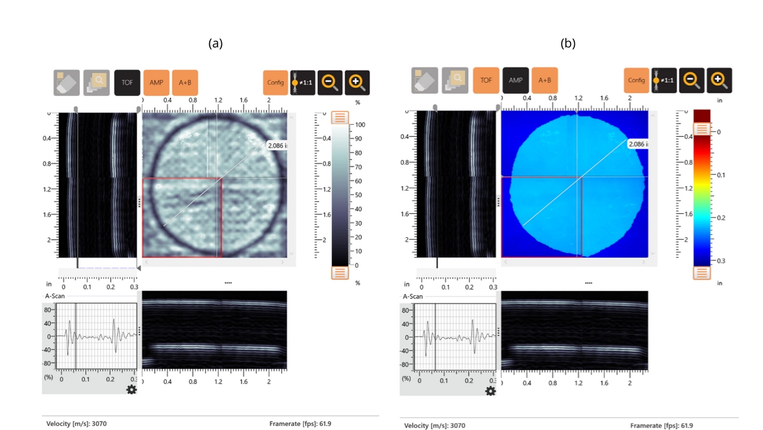
Figure 15. Item 11 (a machined FBH), that was embedded in the taper between ply 8 & 9 (0.060″) (a) Corresponding manually stitched FMC C-scan (AMP) of Item #11. (b) Corresponding manually stitched FMC C-Scan (TOF) of Item #11.
Figure 16 details Item #12, a FBH machined between ply 8 & 9 of the laminate, over the taper region. The orange circle in the TOF View represents Item #12. The blue region represents the backwall of the taper. Measuring the flaw using the line measurement tool results in a diameter reading of 0.249″
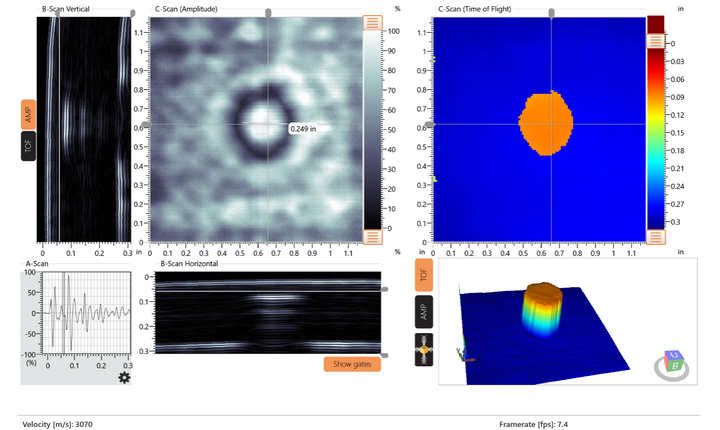
Figure 16. All view screenshot of Item #12 (FBH), which was machined between ply 8 & 9 (0.180″) of the laminate over the taper region.
Figure 17 details Item #13, a FBH machined between ply 8 & 9 (0.060″ ) substructure. The blue circle in the TOF view represents Item #13. The blue region represents the backwall of the substructure. Measuring the flaw using the line measurement tool results in a diameter reading of 0.501″.
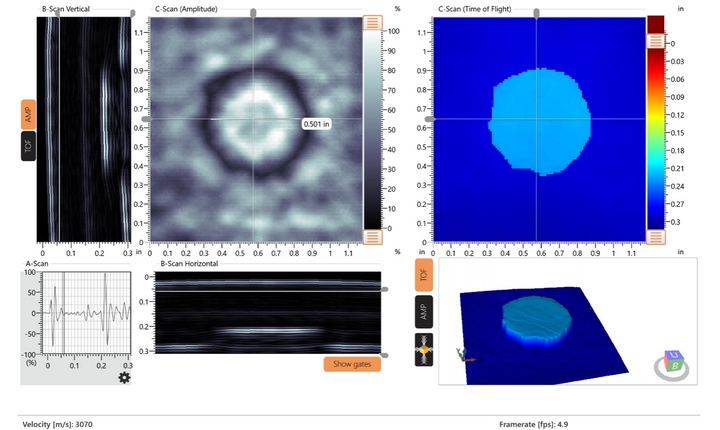
Figure 17. All view screenshot of Item #13 (FBH), which was machined between ply 8 & 9 (0.060″) of the substructure.
Figure 18 details Item #14, which is prepreg backing embedded between ply 4 & 5 (25%) of the 16-ply laminate. The red triangle in the TOF view represents Item #14. The yellow region represents the backwall of the 16-ply laminate. Measuring the flaw using the line measurement tool shows a reading of 0.747″.
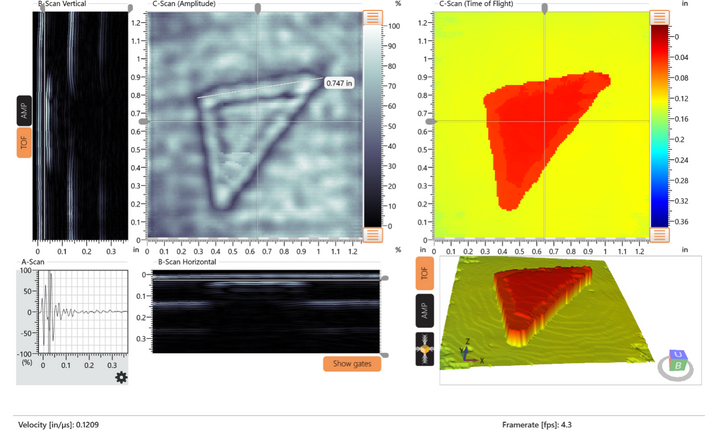
Figure 18. All view screenshot of Item #14 (prepreg backing), which was embedded between ply 4 & 5 (25%) of the 16-ply laminate.
Figure 19 details Item #15, prepreg backing, that was embedded between ply 12 & 13 (75%) of the 16-ply laminate. The yellow regions of the TOF View represent Item #15. The green region represents the backwall of the 16-ply laminate. Measuring the flaw using the line measurement tool shows a reading of 0.976″ along the X-axis and 1.043″ along the Y-axis.
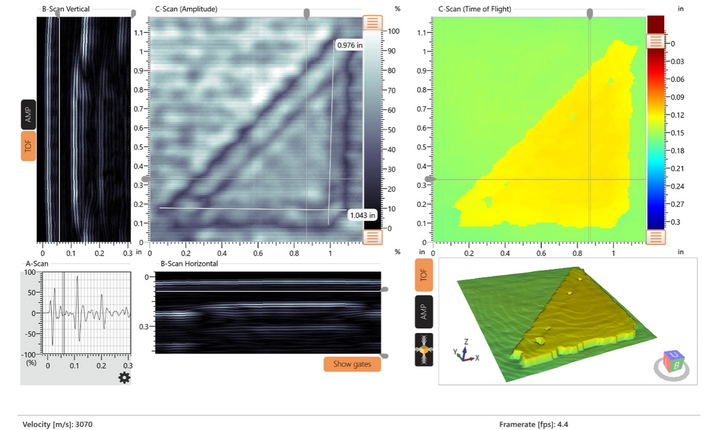
Figure 19. All view screenshot of Item #15 (prepreg backing), which was embedded between ply 12 & 13 (75%) of the 16-ply laminate.
Figures 20 details Item #16, prepreg backing, that was embedded between the adhesive and ply 1 of the substructure. The green regions of the TOF view represent Item #16. The blue region represents the backwall of the substructure. Measuring the flaw using the line measurement tool shows a reading of 1.497″ along the X-axis and 0.498″ along the Y-axis.

Figure 20. (a) All view screenshot of Item #16 (prepreg backing), that was embedded between the adhesive and ply 1 of the substructure. (b) Corresponding manually-stitched FMC C-scan (AMP) of Item #16. (c) Corresponding manually-stitched FMC C-Scan (TOF) of Item #16.
Figure 21 details Item #17, a sealant blob, that was smeared on the backside of the 16-ply laminate. The darker blue regions of the TOF View represent Item #17. The light blue region represents the backwall of the 16-ply laminate. Measuring the flaw using the line measurement tool shows a reading of 1.02″ along the X-axis and 2.271″ along the Y-axis.

Figure 21.(a) All view screenshot of Item #17, the sealant blob on the backside of the 16-ply laminate. (b) Corresponding manually-stitched FMC C-scan (AMP) of Item #17. (c) Corresponding manually stitched FMC C-Scan (TOF) of Item #17.
Figures 22 details Item #18, a sealant blob, that was smeared on the backside of the 16-ply laminate. The dark blue regions of the TOF View represent Item #18. The light blue region represents the backwall of the 16-ply laminate. Measuring the flaw using the line measurement tool shows a reading of 0.807″ along the X-axis and 3.077″ along the Y-axis.
 Figure 22. (a) All view screenshot of Item #18 sealant blob, that was smeared on the backside of the 16-ply laminate. (b) Corresponding manually stitched FMC C-scan (AMP) of Item #18. (c) Corresponding manually stitched FMC C-Scan (TOF) of Item #18.
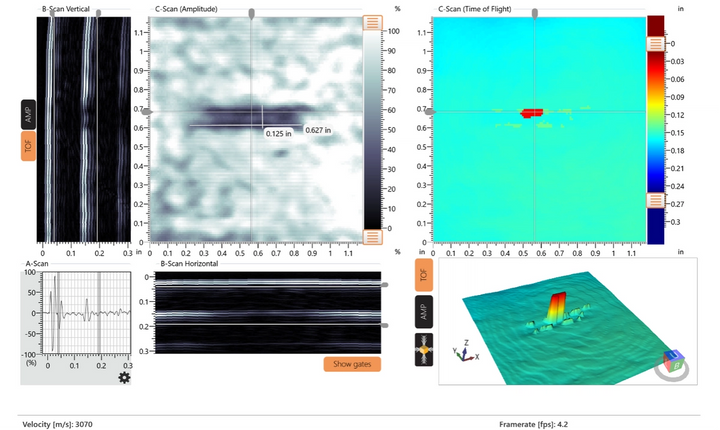 Figure 23. All view screenshot of Item #19, a grind disk groove on the backside of the 16-ply laminate.
Table 2. Nominal and measured dimensions of flaws with the difference between them as a percentage.
CONCLUSION
The dolphicam2 with a TRM-AF-3.5MHz transducer (TRM) was able to successfully inspect the FAA NDI Proficiency Specimen 1A. All the manufactured flaws present were clearly resolved and characterized. These flaws are categorized as Carbospheres, pillow inserts, grease, Grafoil, flat bottom holes, prepreg backing, adhesive backing, and sealant. Moreover, the flaws could be sized, and they were found to be in good agreement with nominal dimensions. The time and cost savings enabled by the dolphicam2 is demonstrated by this ability to characterize such a wide range of flaw types with a single setup. The TRM-AF-3.5MHz transducer is versatile and well-suited for many aerospace applications featuring thin to moderate thicknesses of both composites and bonded substructures.
REQUEST A QUOTE OR SUBMIT AN ENQUIRY
Need help with product information?
Get in touch with our experts for information or a quotation.

